To know about the instructions for Candling Eggs to Assess Fertility and Embryo Development, visit Beauty of Birds you can get all the information related to Candling Eggs.
FREE Training to Stop Your Bird's Biting
Get FREE access to Beak School – the only system designed to train your bird. Stop behavioral problems like biting, screaming, feather plucking.
Get the Free Training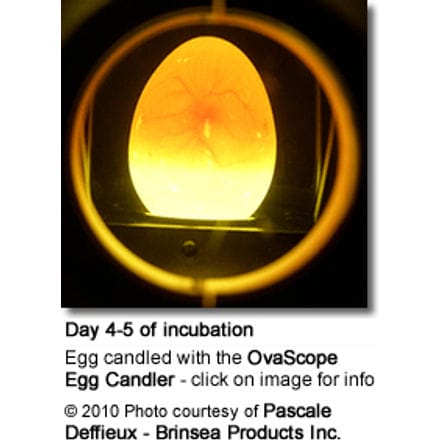
Useful Information: Breeders’ Resources (covers everything from handfeeding to potential breeding / chick problems) … Incubation Information … Information on Housing Chicks, Temperature Requirements, etc.
Not all incubated eggs will hatch. It is estimated that only 90 percent or less of incubated eggs are fertile. Removing dead / infertile (spoiling) eggs will better chances of the other eggs for a successful hatch.
FREE Training to Stop Your Bird's Biting
Get FREE access to Beak School – the only system designed to train your bird. Stop behavioral problems like biting, screaming, feather plucking.
Get the Free TrainingShining a light through the egg to observe embryo development is called “candling.” White or pale eggs are more easily candled than dark or speckled eggs, which require a high-intensity candler.
FREE Training to Stop Your Bird's Biting
Get FREE access to Beak School – the only system designed to train your bird. Stop behavioral problems like biting, screaming, feather plucking.
Get the Free Training- Embryo Development (explains what happens inside the developing egg) … Glossary
- Causes of Infertility and Poor Hatching Rates… Dead-in-Shell / Embryo Mortality
- Photo Series: From Egg to Parrot – Amazing series of photos of candled eggs – from Day 1 through Hatching
Candling Devices:
- Excellent candlers are available at a reasonable cost. Available egg candlers – including regular models as well as high-intensivity candling devices which work on all eggs, including darker / mottled eggs — and will provide you a clearer view of what is going on inside the egg.
- It is possible to make candling devices yourself (please see below instructions) and they suffice for the most part when you are candling pale / white eggs. Darker / mottled eggs require a high-intensity candler.
- Casual breeders may use small flashlights with lenses the size of a nickel that can be focused to candle eggs; in the absence of such a flashlight
- Simple Candling Eggs devices can be made by inserting a light into a container and cutting a small hole to emit light, or by taping a cone formed from several thicknesses of paper over the lens of a bright light projector. The hole that allows light to pass from the tip of the cone should be the size of a dime or quarter (depending upon the size of the egg).
 Procedures to follow:
 Procedures to follow:
- Candling: In a dark room, hold the egg to the light of the candler to observe the contents of the egg. Cooling that occurs for short periods (less than 10 minutes) during careful examination of eggs does not harm the development of the embryo. (Please refer to the “cooling feature” included with some of the later incubator models.) However, limit the exposure of the egg to the hot light source. Even a brief period at 104 degrees F kills all embryos.
- The presence of embryos can be confirmed easily after 8 days to 12 days of incubation.
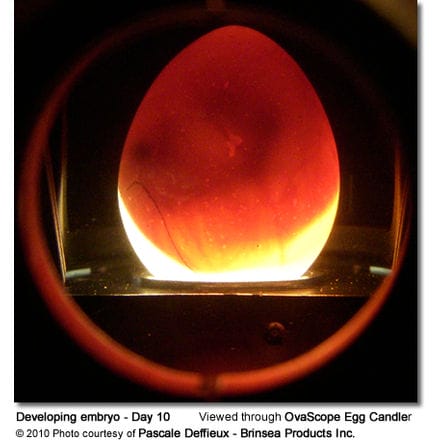
- The embryo is located in the large end of the egg, where blood vessels radiate under the surface of the shell.
- The embryo appears as a dark spot that becomes larger as incubation progresses. Eventually only a dark mass and the air cell are seen.
- An infertile or unincubated egg brightly transmits light in comparison.
- Dead embryos will sometimes appear as a ring or smear of blood in the egg or a dark spot dried to the inside of the shell.
- The living embryo will appear as a dark spot in the large end of the egg surrounded by a faint outline of blood vessels. The blood vessels will appear firm and distinct.
- After embryo death, the embryo no longer grows and the blood system fades.
- Remove infertile or nongrowing eggs from the incubator or from the nesting boxes.
Float Test / Water Candling
Another popular method is “Water Candling” aka the “Float Test” – please refer to the following video for instructions:
FREE Training to Stop Your Bird's Biting
Get FREE access to Beak School – the only system designed to train your bird. Stop behavioral problems like biting, screaming, feather plucking.
Get the Free TrainingOf course, water candling won’t show you the detail that can be observed through “light candling” – but it will serve the purpose of identifying “live eggs.”
Egg Development:
- The egg looks clear. Either too early for candling (has to be 8-days since the start of the incubation). If clear after 8 days of incubation, the eggs are probably infertile or the embryo died at an early stage.
- Fertile egg with red blood veins – only visible after 8 days of incubation
- Rote oder schwarze Färbung – early embryo death — if candled after 8 days of incubation or later.
- Embryo with red “Blood” ring – early death
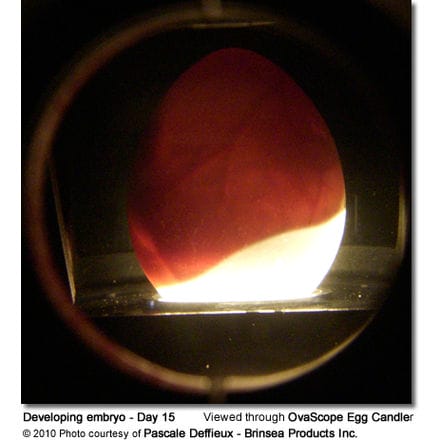
- Dark outline with ill defined detail – late death (10-16 days)
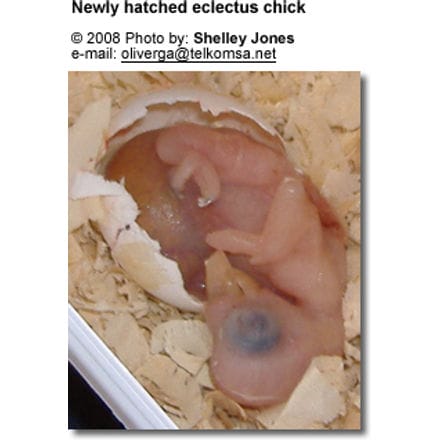
- Live embryo with bill in air sack – due to hatch in 24-48 hours
- Normal development of the air pocket according to number of days Species Research by Sibylle Johnson